Quick Start Guide
Jump to navigation
Jump to search
BioCompute is a powerful tool used for workflow documentation, most commonly for computational analyses and life sciences. It improves transparency and reproducibility in bioinformatics research. A BioCompute Object (BCO) is a representation, in JSON, which can be visualized in any number of ways. This portal has three ways of viewing: the Tree view, Raw view and Collapsible view.
The portal website at https://biocomputeobject.org/ has a plethora of documentation and resources including the BioCompute Wiki. The purpose of this quick start guide is to give you a concise starting point.
How to get started
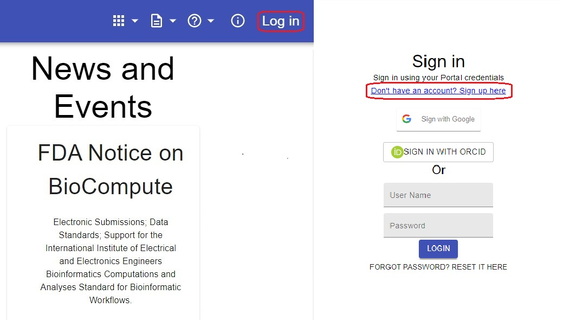
- Create an account: Sign up for an account to access the platforms features using the 'Log in' button on the right hand corner of the screen. This will direct you to a sign in page where you can log in or sign up for a new account.
- Accessing documentation: The platform offers convenient access for searching and downloading public BioCompute Objects without signing in. However, to create and modify BCOs, signing in is necessary.
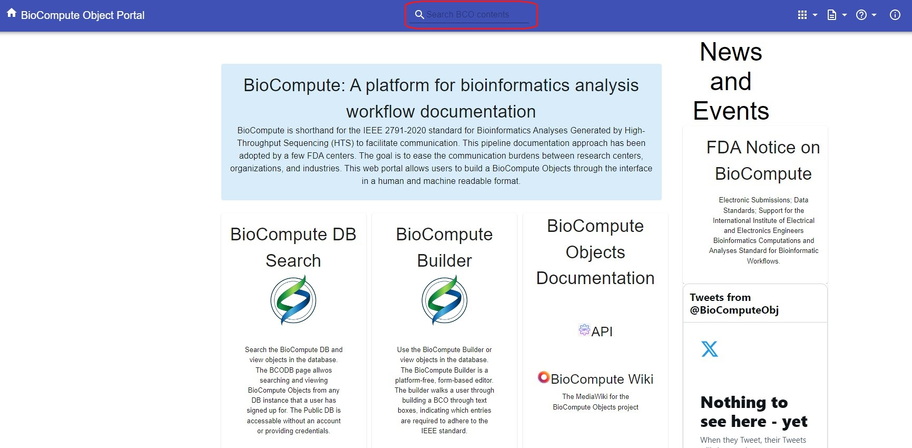
- Navigating the interface: The navigation bar serves as a convenient hub for exploring the interface.
- Home Button: Click the 'Home' button at the top left corner to return to the main page at any time.
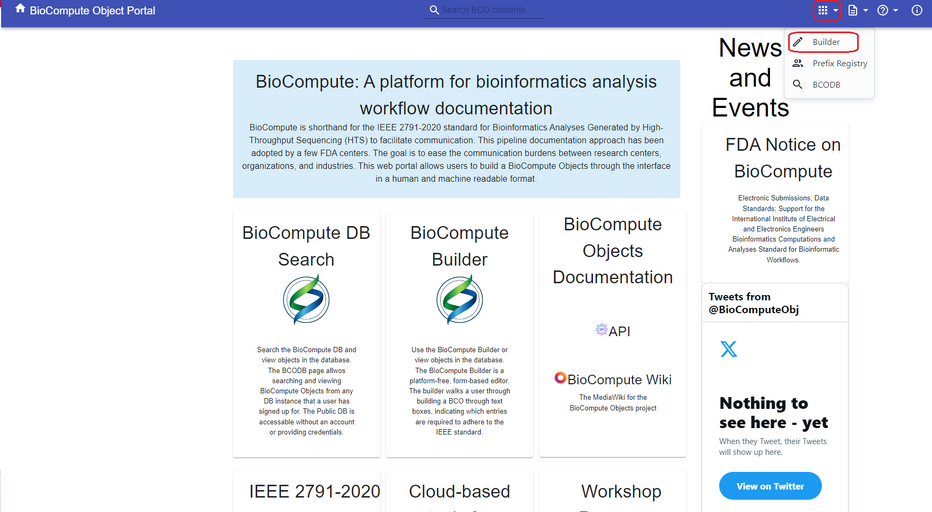
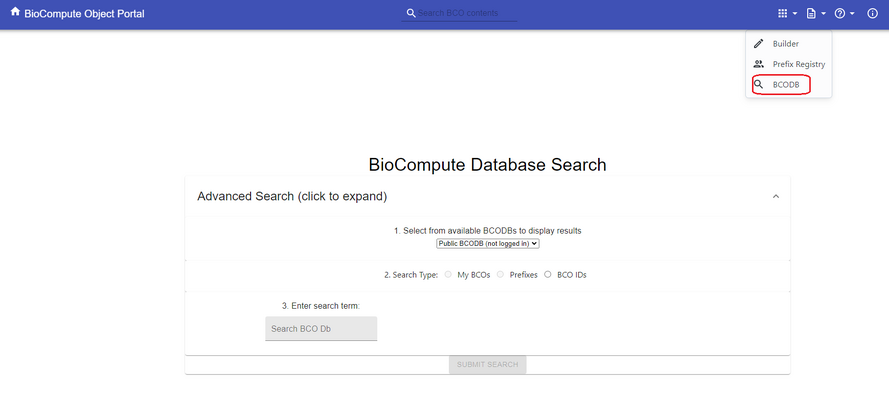
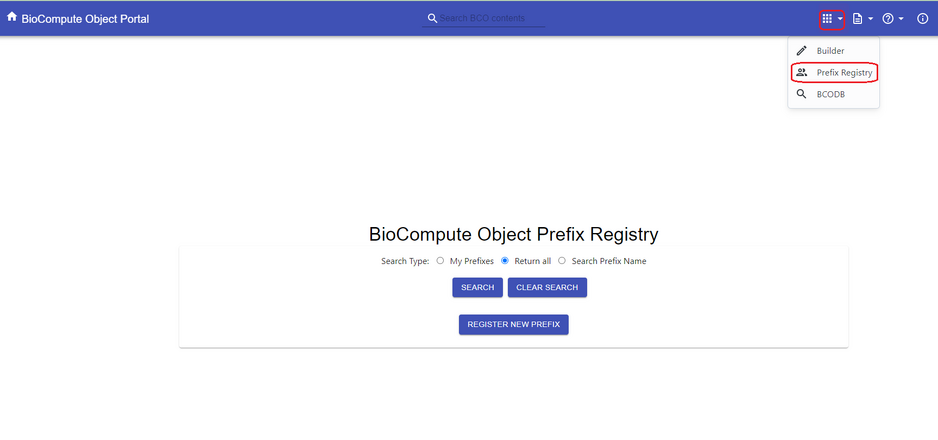
- Apps (Top Left) : The first icon opens a dropdown menu with quick access to the Builder, Prefix Registry, or BCODB (BCO Database).
- Documentation (Top Right) : The second icon reveals a dropdown menu with links to the Quick Start Guide, BioCompute API, Wikipedia page, and BCO Resources.
- Support (Top Right): The third icon pens a dropdown menu for reporting issues or contacting support if you encounter any concerns.
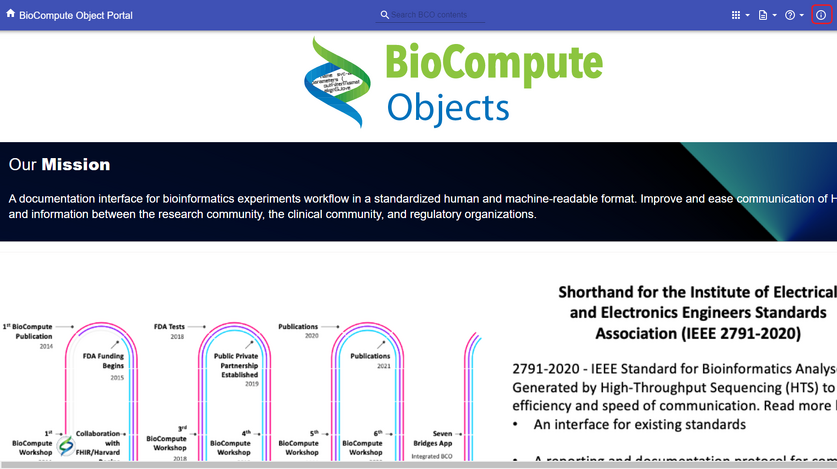
- Info Icon: This provides more information about BioCompute, including its mission, story, goals, and details about our team members and collaborators.
How to create a BCO
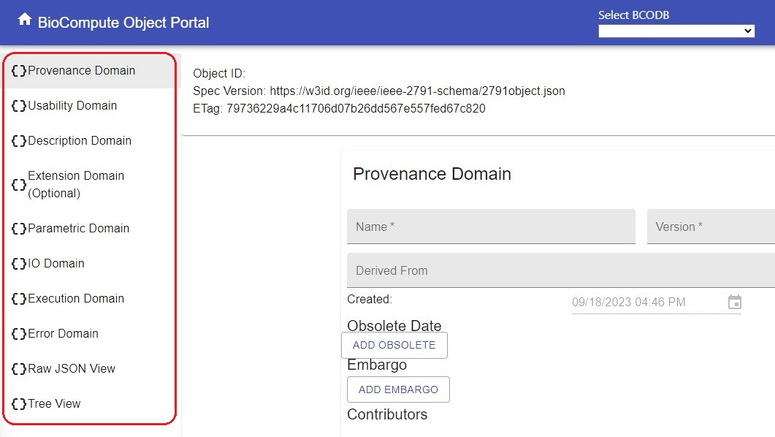
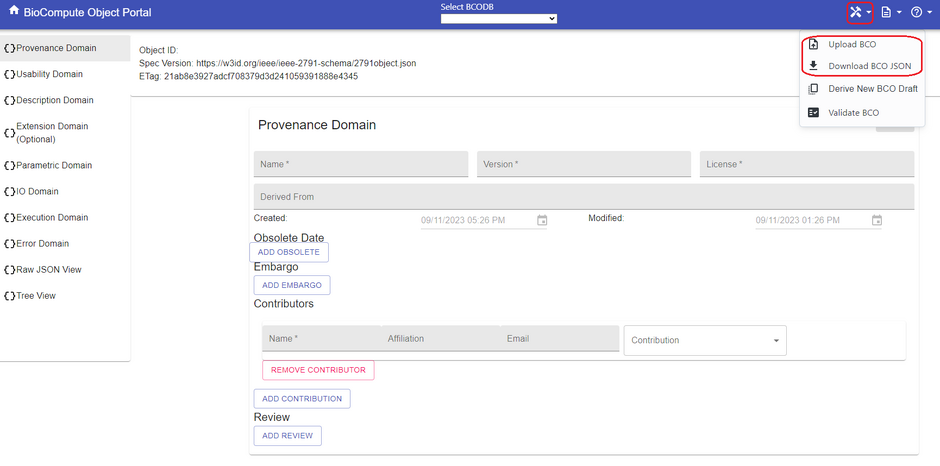
- Starting a New BCO: To create a new BCO, click on the BCO tools icon shown in the top right corner. From the drop-down menu, select the ‘Builder’ icon. This will direct you to a page with the different domains on the left side of the screen.
- Defining workflows and Analysis: When creating a BioCompute Object (BCO) there are various domains that will require attention as each of them serve as a specific purpose in documentation to maintain accuracy and comprehensiveness. There are eight top-level domains, only five of which are required: Provenance domain, Usability domain, Description domain, Input and Output Domain, and Execution domain. For more detail on the different domains go here.
- Provenance Domain: This domain deals with tracking the history and lineage of data and processes, including authors and contributors involved in an analysis.
- Usability Domain: It focuses on the purpose of the analysis allowing goals of an analysis to be easily understood when using the BCO.
- Description Domain: This domain provides information and context about data and processes of an analysis, helping users understand what they are working with.
- Extension Domain (Optional): This domain identifies additional schema extensions that may be required.
- Parametric Domain: This domain involves defining and managing parameters or variables that influence the behavior of an analysis.
- Input and Output (I/O) Domain: It deals with the input data involved in the process of an analysis and the corresponding output or results generated.
- Execution Domain: This domain covers the actual running of processes, scripts, or software applications, ensuring they perform as intended.
- Error Domain: It pertains to the acceptable range of variation in analysis results, showing what errors can arise outside the tolerance levels of certain inputs and outputs, helping to optimize algorithms.
- Saving and Validating BCO: Before publishing, review and save the BCO to ensure accuracy of the information that you have entered into your BCO and that your data is not lost. This will require validating the BCO under 'BCO Tools'. You can also validate your BCO on a JSON Schema validator against this schema. Once the BCO is validated you can proceed to publishing your BCO.
- Publishing: Once you are certain that your documentation is complete, you can proceed to publish the BCO, making it accessible to collaborators or the community if desired.
Where do I go to search for an existing BCO
- BioCompute Database Search: At the top of the page, you'll find a convenient search bar. It provides direct access to the BCO repository, where you can explore and search for existing BioCompute Objects (BCOs)
- Advanced Search: If you need more specific search results, we offer an advanced search option. You can filter your search by BCO IDs, names/titles, and prefixes. This feature allows for precise and efficient discovery of the BCOs you're looking for.
- Prefix Registry: The Prefix Registry is a BioCompute feature that helps you organize and collaborate efficiently. It allows you to group related BioCompute Objects (BCOs) under specific prefixes. Instead of juggling multiple BCOs from different projects or areas, you can assign a unique prefix to each project or category. This makes it easy to distinguish and find BCOs when you search or collaborate. In a nutshell, the Prefix Registry streamlines organization and collaboration by providing clear labels for your BCOs, making your work more efficient.
- Downloading and Viewing BCOs: On the builder page, you have the option to download BCOs directly to your local device as JSON files to be viewed offline at your convenience. If you have BCOs stored that you would like to bring to the BioCompute platform, you can easily upload them seamlessly from your device for further editing, sharing, or collaboration. This functionality enhances your workflow by providing flexibility and accessibility to your BCOs from anywhere, at any time.
